
- Видео 28
- Просмотров 99 296
4xFar Adventures
США
Добавлен 17 мар 2017
This channel is meant for anyone interested in off road driving, or overland adventure travel. 4xFar Adventures is here to get you better trained, and better informed when it comes to off road driving techniques, recovery and spotting.My videos will show you how to safely use your equipment, explore Tread Lightly! principles and have a lot of fun out on the trail!
Видео


Dimensions for a Land Rover Discovery 2 Mantec Snorkel pt 4
Просмотров 9125 лет назад
Here's the template for cutting the fender and some tips for proper fitment.
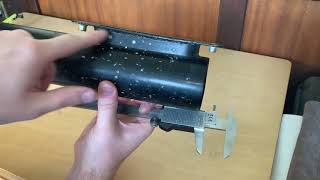
Dimensions for a Land Rover Discovery 2 Mantec Snorkel pt 3
Просмотров 1,6 тыс.5 лет назад
Here are the dimensions for the main section of the Mantec snorkel. The twist coming out of the fender is probably the trickiest part of the entire setup.

Dimensions for a Land Rover Discovery 2 Mantec Snorkel pt 2
Просмотров 3965 лет назад
Some more dimensions for the airbox section of the Mantec snorkel.
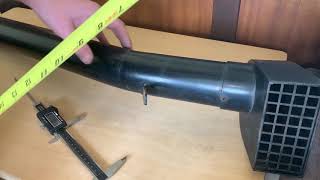
Dimensions for a Land Rover Discovery 2 Mantec Snorkel pt 1
Просмотров 1,3 тыс.5 лет назад
If you want to build your own version of the Mantec snorkel for your Discovery 2, here's an overview of the parts and dimensions of it. This parts covers the attachment to the fender/airbox, and the flex tube.

Hi-Lift Fix It Kit Replacement
Просмотров 72 тыс.6 лет назад
In this video, you'll learn how to replace the Climbing Pins, Cross Pins, Springs, and Safety Shear Bolt in the Hi-Lift Fix It Kit.


The Alpine Butterfly Knot
Просмотров 377 лет назад
The Alpine Butterfly is tied here in a little less confusing way. Use it to form a loop in the middle of your rope. It lies inline with the rest of the rope and is perfect for keeping you equipment and clothes form all sliding to the center and weighing it down.
The Bowline Knot
Просмотров 387 лет назад
Use the Bowline to make a fixed loop at the end of your rope. This is a different way to tie it compared to the traditional rabbit and the hole technique.
The Constrictor Knot
Просмотров 667 лет назад
The Constrictor knot is great for binding. It can be almost impossible to untie if put under a heavy load. It can also be used for makeshift hose clamp or cable tie.
Spotting With Bill Burke 3
Просмотров 1247 лет назад
Clear hand signals, wide arm movements, and eye contact are imperative to good spotting. A driver does no more and no less than told. A driver can fire the spotter at any time, for any reason.
Spotting My Own Truck
Просмотров 457 лет назад
I created this video with the RUclips Video Editor (ruclips.net/user/editor)
Spotting With Bill Burke 2
Просмотров 1067 лет назад
Clear hand signals, wide arm movements, and eye contact are imperative to good spotting. A driver does no more and no less than told. A driver can fire the spotter at any time, for any reason.
The guy in the hat came and stood right over the line when it was on significant load, not very safe. However, a good demonstration to show how effective a winch can be when used correctly.
THANK YOU! Finally found a well done video on this topic. A+
I was out and about and found a jack similar to the one in your video on the side of the road yeah it's a rusty mess seems to be able to work once more after I learn a thing or a few about it now I stumbled upon this info looking for something else did not realize that it has replaceable parts as this thing I found someone was throwing it out so for the price of fixing it I got a pretty neat jack now the hard part is not hurting myself learning to use it after seeing your video yeah it's got issues and pretty sure stuff I learned here can have this up and going in no time Now the question is were to find these parts till I find out what hat stuff in my yard it sits in penatrateing oil
Nice setup but no Dampers Incase cable breaks
Thank you so much brah
4:30 - important. Thanks!
Thank you for taking the time. Many jack videos, go to fast cover climbing pin replacement. Thanks.
What do you use for the stiching meterial?
Excellent video right to the point and you make the video about the job at hand and not all about you. Thank you for that
Lubricate, Lubricate, Lubricate!! I didn't see anything on Lubrication. Good pictorial on how to replace Jack pins & springs. I would have personally lubricated each & very part before going into their place. Nice cover to protect to climbing assembly.
Any help providing the template is appreciated!
Im looking for the template as well
Hi its pozzo btw
Thanks. I didn't know a repair kit was available. I do think that cover will hold in moisture and make it rust faster though.
Can I buy the snorkel from you?
Thanks, the base of the jack its loss shell i weld it keep annoying me
Hi! Do you have the template in pdf for me?
I wish all how-to do videos were like this. Short sweet and to the point.
Good information. For what it is worth, some manufacturers suggest that the twine used for the lock stitch, should have a diameter that is approximately equal to the diameter of a single braid used in the construction of the line you have spliced.
Samson is quite explicit about this in their lock stitch instructions, as well as not having it too tight. From their video I gather that the reason you want your lock stitch braid to be about the same thickness for burying the knot of the lock stitch, preventing the need to wrap the twine around at the end.
or you can do an appropriate locking eye splice. Not to be that guy but that is not the correct splice for a dyneema eye that will be used under load. You are now relying on stitching to hold the line from slipping under load. A true locking eye splice will never slip. Understandably if this is a double ended eye splice with thimbles on both ends then yes you would have to use this method. would not recommend this though if you can make a true eye splice
Sorry, but you are incorrect on a number of things. First and foremost, all buried splices derive their strength under tension from friction between the outer braid and the braids of the tail buried within them, which occurs when the outer braid constricts onto the buried tail under tension (i.e. the chinese finger trap analogy). Lock stitching and whip stitching have nothing do with the strength of a splice under tensile load, and a long bury eye splice, done correctly, is actually the single strongest eye splice under tension (but the difference is negligible compared to other real world factors with working rope). The locking splices are about what happens when the eye is not under tension, which is precisely what the lock stitching is also about. Lock stitching is to prevent the tail from working its way back out from the bury when it is not under load. That is important because, as mentioned, the tensile strength of the splice under load relies on generating sufficient friction, which is a function of the buried tail length. So, a suitable length of buried (and properly tapered) tail is required to generate enough friction (and avoid stress risers in the fibers by minimizing the rate of change in their angle). In the case of a long bury eye splice, the bury length is generally recommended to be at least 72x the rope diameter. A locking splice, like a Brummel eye splice or it's similar variants, uses the spliced line itself to help achieve this, as it locks together to prevent the buried tail from working it's way free when not under load. Most locking splices in professional use for life support and rigging, will tend to get lock stitched anyway, just for added insurance. Purely stitched eyes in rope are a whole different game, and are totally unrelated to lock stitching.
I just want to add to what @TheMadMagician87 said by linking to Samson's eye splice guide. It does NOT use a locking Brummel and relies entirely on burying the tail, with a lock stitch to keep it from coming out when not under load. samsonrope.com/docs/default-source/splice-instructions/12strand_c2_eye_splice_web.pdf
Lol. If you have no clue what you’re talking about, why comment?
Nice video! I was wondering about the size of the looping wire lock pin? Can you please share? Thanks!
1/4 x 2 .....that’s what I have on mine.
@@notwlcom Thanks!
Nice presentation. Thanks!
I have installed new fix it kit accordingly, problem it is stucked unable to release downwards - it can only up- big time 'stucked'
I have the same issue, did you ever find the problem?
Great video! Do you have a link for parts or part number?
The best dirt bike trail I’ve been on in 32 years
A little oil would of fixed it for another 10 years.... Your supposed to oil with ever use.
I would of just wire wheeled the pins and oiled them.
That's why I fabbed up an interior mount for mine. Lol I still keep a rebuild kit in my bag though just in case. Mine's 5 years old now and been used 8 or 10 times but still looks like new because it stays inside the vehicle.
Added thing I like to do is give the stitching a coat of nail polish or similar..helps with wear, loosening, fraying, etc...
Any gps coordinates on how to get to this trail?
It's very easy to find
I read that all the m35 axles were lockers
A good spotter is invaluable. This gentleman's hand signals are clear and concise. His rapid arm movements are perfectly timed with when he wants that particular action to take place. Well done
Bill Burke is a master of 4x4.
Thanks for the video man. I took my high lift jack off of my old 4 x 4 for the first time in 15 years and it was doing exactly what yours was before the repair.
Nice! The Step 22 Jack covers are really nice. We had to get out the high lift on day 5 of the rally and after 6 days of dust and dirt the gears were nice and clean.
Is there a way around this? Im taking a stock f150 this weekend and wondering if there is a bypass or something
Did you ever find out the answer? Or how did you do? I’m headed there in a couple weeks.
@@chrischambless A little late but for the next guy, yes there is a bypass. Its a very quick detour. We scouted this this out but ended up going down the wash.
what size of whipping twine would you recommend for 14mm dyneema rope?
Hey @callumluescher, you can use #4 whipping twine, same as what I used in the video.
I'm sure you are done with your line, but as per my comment: "For what it is worth, some manufacturers suggest that the twine used for the lock stitch, should have a diameter that is approximately equal to the diameter of a single braid used in the construction of the line you have spliced. "
one of my favorite knots.
Thanks for the post. Very detailed and easy to follow. Used for my yachts jib halyard which has a captive "dogbone" to attach to the sail, hence i could not do the locking brumel splice
what type of needle is that and where can it be purchased?
I'm not sure what the needle is. It's included with the winchline.com splicing kit. You could probably use an upholstery needle, or possibly a sailing needle if that's all you are looking for.
Now thats how to use a winch. Not just the rigging but the deuce not flooring it or letting on/off the clutch. A dampener would have been safer tho.
We were using synthetic line so there was a low chance of it doing damage even if someone was close enough when it broke.